The Domain Name System (DNS) acts as the internet’s address book, translating website names into IP addresses so that you can access them quickly and efficiently. To speed things up, your device stores DNS data locally in a cache.
However, this cache can sometimes become outdated or corrupted, causing issues such as slow connections, website errors, or security vulnerabilities. Fortunately, flushing DNS clears the cache, helping resolve these problems. This guide will show you how to flush DNS on Windows, Mac, and Linux, step by step.
Understanding DNS and DNS cache
To delve into flushing the DNS cache, it’s first crucial to clarify what DNS is and its significance.
DNS translates easy-to-remember domain names, such as mywebsite.net into numerical IP addresses that computers use to locate websites. This ensures your device quickly finds the correct server whenever you browse online. To save time, this data is stored temporarily in a local cache.
While helpful, the DNS cache can cause problems if it becomes outdated or contains incorrect information. For instance, you might experience issues like:
- Websites not loading correctly.
- Pages showing outdated content.
- Connection errors when the DNS cache conflicts with updated server data.
Therefore, flushing DNS cache is a quick fix for resolving connectivity problems and ensuring smoother browsing.

When should you flush DNS?
Flushing DNS isn’t something you need to do every day, but there are specific scenarios where it becomes necessary:
- Websites fail to load: If you encounter errors or cannot access certain sites despite having an active internet connection, the DNS cache may be at fault.
- DNS server changes: Switching to a new DNS provider, such as Google DNS or Cloudflare, requires clearing the old cache to ensure proper connectivity.
- Malware or security concerns: DNS cache poisoning or hijacking can redirect you to malicious websites. Flushing DNS removes potentially harmful entries.
In such situations, flushing your DNS cache helps restore smooth and secure browsing, ensuring your device connects to the right destinations.
How to flush DNS on Windows
Windows offers multiple methods to flush DNS, primarily through Command Prompt and PowerShell. Let’s dive into the steps:
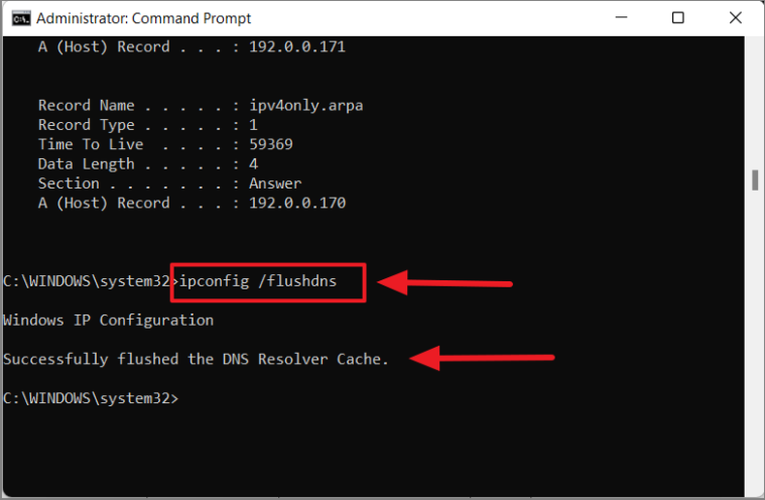
Using Command Prompt
- Press Win + R to open the Run dialog box.
- Type
cmdand press Enter to open Command Prompt. - In the Command Prompt window, type the following command:
ipconfig /flushdns - Press Enter. You’ll see a confirmation message: “Successfully flushed the DNS Resolver Cache.”
Using PowerShell
- Press Win + X and select Windows PowerShell.
- Enter the same command:
Clear-DnsClientCache - Press Enter to flush the DNS cache.
These methods work on Windows 10 and 11, but earlier versions like Windows 7 or 8 follow a similar process.
How to flush DNS on macOS
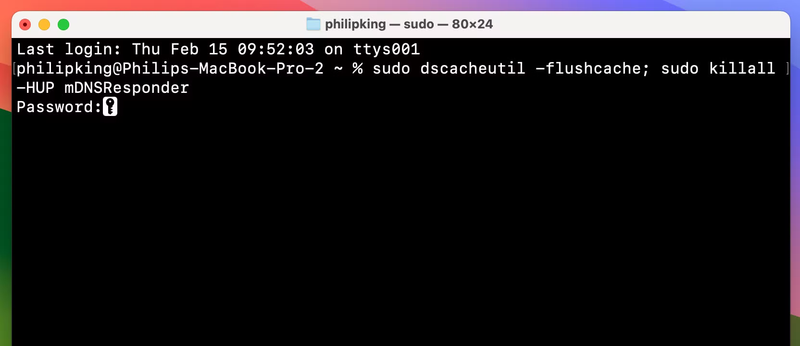
On macOS, you can flush DNS using Terminal. The commands vary slightly depending on your macOS version. Follow these steps:
- Open Terminal by pressing Command + Space, typing “Terminal,” and hitting Enter.
- Enter the appropriate command based on your macOS version:
- For macOS Ventura or later:
sudo dscacheutil -flushcache; sudo killall -HUP mDNSResponder - For older versions:
sudo killall -HUP mDNSResponder
- For macOS Ventura or later:
- Press Enter and enter your admin password when prompted.
- There won’t be a confirmation message, but the DNS cache will be cleared.
How to flush DNS on Linux
Linux systems often use tools like systemd-resolved or dnsmasq for DNS caching. The exact steps depend on your distribution and setup.
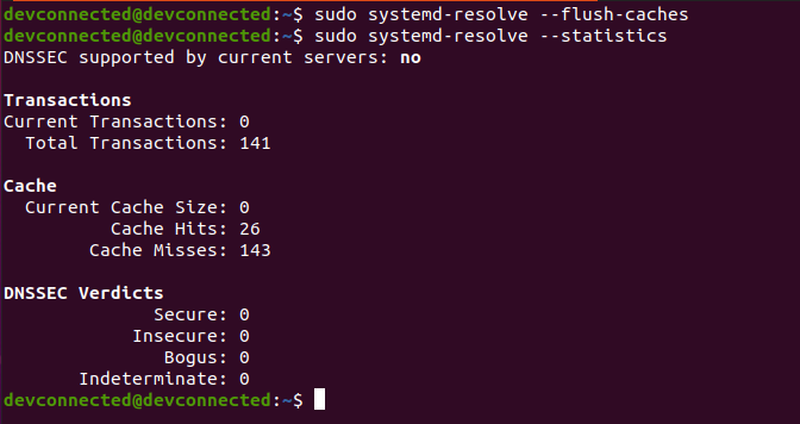
For systems using systemd-resolved:
- Open a terminal window.
- Type the following command:
sudo systemd-resolve --flush-caches - Press Enter to clear the DNS cache.
For systems using dnsmasq:
- Restart the
dnsmasqservice with the command:sudo systemctl restart dnsmasq - Press Enter to apply the changes.
If you’re unsure which DNS caching service your Linux distribution uses, consult the documentation or use a universal approach by restarting the network service:
sudo service network-manager restart
Verifying the DNS cache is flushed
After flushing the DNS cache, you might want to confirm the operation. Here’s how:
- Windows: Use Command Prompt and type:
ipconfig /displaydnsAn empty list indicates the cache is cleared.
- macOS: There isn’t a built-in verification command, but you can test by accessing a previously visited website and checking for changes.
- Linux: For
systemd-resolved, use:sudo systemd-resolve --statisticsThe output will show reset statistics.
Additional tips for managing DNS
Managing DNS effectively goes beyond just flushing the cache. Consider these tips:
- Switch to a reliable DNS provider: Services like Google DNS (8.8.8.8, 8.8.4.4) or Cloudflare (1.1.1.1) often provide faster and more secure browsing.
- Regular maintenance: Flushing DNS periodically can help avoid caching issues and improve connection reliability.
- Use tools for monitoring: Applications like DNS Benchmark or What’s My DNS can help identify DNS-related problems and optimize your settings.
By adopting these practices, you can enhance your DNS performance, improve security, and ensure a smoother online experience.
Conclusion
Flushing DNS is a straightforward yet powerful way to resolve network issues, improve browsing performance, and enhance security. Whether you’re on Windows, macOS, or Linux, following the steps in this guide ensures you can clear your DNS cache quickly and effectively. Bookmark this article as a handy reference, and don’t hesitate to share it with others who might benefit from these tips!
Read more

Best residential proxy providers in 2026: Real-world tested

How to configure and manage SwitchyOmega proxies

NiuProxy review: Is this affordable proxy provider worth using?

711Proxy review: Is it the right proxy provider for your needs?

What is a SOCKS5 proxy? Why is it a high-performance standard?
